bottleはPythonのフレームワークの中でも一番簡単なものです。
bottleを使ってHTMLファイルのテンプレートを使用してみたので、まとめてみました。
bottleのインストール
コマンドプロンプト(Macはターミナル)を開いて、以下のコマンドを打てばbottleがインストールできます。
pip install bottle
テストとして、以下のコードを『template.py』に書きます。
# coding: utf-8
from bottle import route, run

@route('/')
def index():
    return "Hello World"

# プロセスの起動
if __name__ == "__main__":
    run(host='127.0.0.1', port=8080, reloader=True, debug=True)
コマンドプロンプトに以下のコマンドを打ち込んで、
python template.pyhttp://127.0.0.1:8080/にアクセスすれば「Hello World」が表示されます。
bottleでテンプレートを使用してみた例
例1:変数を表示させる
HTMLのテンプレートファイルを使ってみます。ファイル構成は以下の通り。
.
├── template.py
└── views
    └── index.html
以下のコードを『template.py』に書いて、
## coding:utf-8
from bottle import run, route, template

@route("/")
def index():
    username = 'hogehoge'
    return template('index', username=username)

# プロセスの起動
if __name__ == "__main__":
    run(host='127.0.0.1', port=8080, reloader=True, debug=True)
以下のコードを『index.html』に書きます。
<!doctype html>
<html lang="ja">
<head>
  <meta charset="UTF-8">
  <title>テンプレートのテスト</title>
</head>
<body>

  <p>{{ username }}さんようこそ</p>

</body>
</html>
すると、以下のように表示されます。HTMLのテンプレートファイルの「username」の変数に、『template.py』で指定した「hogehoge」が入っています。

bottleを使ってフォームに入力した値を別ページで表示させる
さらに、2つのテンプレートファイルを使って、フォームに入力した値を別ページで表示させてみます。
ファイル構成は以下の通り。
.
├── template.py
└── views
    └── index.html
    └── result.html
『template.py』のファイルには、2つのページにアクセスしたときの挙動を記載します。
# coding:utf-8
from bottle import run, route, template, get, request

# トップページ
@route("/")
def index():
    return template('index')

# フォーム入力結果ページ
@route("/result", method="GET")
def result():
    username = request.query.getunicode("name")
    return template('result', username=username)

# プロセスの起動
if __name__ == "__main__":
    run(host='127.0.0.1', port=8080, reloader=True, debug=True)
『index.html』には、名前を入力するフォーム欄を設けました。
<!doctype html>
<html lang="ja">
<head>
  <meta charset="UTF-8">
  <title>テンプレートのテスト</title>
</head>
<body>

  <form action="/result" method="get">
    名前: <input name="name" type="text" />
    <input value="登録" type="submit" />
  </form>

</body>
</html>
『result.html』には、先ほどの『index.html』とほぼ同じコードを記載しました。ただ、トップページに戻るボタンを追加してみました。
<!doctype html>
<html lang="ja">
<head>
  <meta charset="UTF-8">
  <title>入力結果の表示ページ</title>
</head>
<body>

  <p>{{ username }}さんようこそ</p>
  <button type=“button” onclick="location.href='/'">トップに戻る</button>

</body>
</html>
そして、http://127.0.0.1:8080/にアクセスすると、以下のように名前を入力するフォームが表示されます。

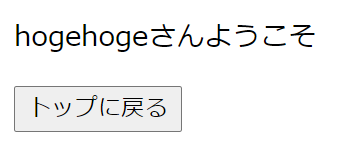
例えば「hogehoge」と入力し、『登録』ボタンを押すと、以下のように表示されます。

(参考)Python Bottleフレームワークのサンプル|ITSakura
例2:テンプレートの継承(拡張)
これはbottleだけでなく、flaskやdjangoなどのフレームワークでも使用できる方法です。
extendsとblockでテンプレートの継承(拡張)をやってみました。
先ほどの例1で使用したテンプレートの共通部分を『base.html』にまとめ、他のテンプレートに継承させます。
ファイル構成は以下の通り。
.
├── template.py
└── views
    └── base.html
    └── index.html
    └── result.html
『template.py』のファイル の中身は以下の通り。テンプレートの継承のために、jinja2が必要になります。
# coding:utf-8
from bottle import route, run, template, get, request
from bottle import jinja2_template as template

# TOPページ
@route("/")
def index():
    return template('index')

# フォーム入力結果ページ
@route("/result", method="GET")
def result():
    username = request.query.getunicode("name")
    return template('result', username=username)

# プロセスの起動
if __name__ == "__main__":

    run(host='localhost', port=8080, reloader=True, debug=True)
『base.html』の中身は以下の通り。
<!doctype html>
<html lang="ja">
<head>
  <meta charset="UTF-8">
  <title> {{ title }} </title>
</head>
<body>

  {% block contents %}
  {% endblock %}

</body>
</html>
『index.html』 の中身は以下の通り。
{% extends 'base.html' %}

{% block contents %}
<form action="/result" method="get">
  名前: <input name="name" type="text" />
  <input value="登録" type="submit" />
</form>
{% endblock %}
『result.html』 の中身は以下の通り。
{% extends 'base.html' %}

{% block contents %}
<p>{{ username }}さんようこそ</p>
<button type=“button” onclick="location.href='/'">トップに戻る</button>
{% endblock %}
例1と同様にhttp://127.0.0.1:8080/にアクセスすると、 例1と同じ画面が表示されます。

「hogehoge」と入力して『登録』ボタンを押すと、同じように表示されます。


